For those wondering about HOW to do this, here’s a short explanation according to me:
Drawing A to Drawing B: -the most obvious change is the exaggeration of the line of motion in the character.
In Drawing B the line of motion is much more pronounced, creating more drama and movement to the whole composition
-The arms are open wider, showing more confidence and exuberance in the character, exaggerating their emotions so they can be more clearly read without having to look to the face for emotional cues.
-the legs are wider apart, adding to the aforementioned confidence but also giving the character a solid foundation, visually speaking.
-The head is tilted back and overlapped by the chest, adding a touch of dynamic perspective to the drawing.
Drawing B to Drawing C: -Most obvious change is to zoom in on the character. Character framing is just as important as what the character is doing. Zooming in can help infensify emotions. this shot is ALL about this character and what they’re feeling. -Because of the zooming in, the arms/hands would have gotten lost, so instead of making the canvas wider, the artist has elected to rotate the character slightly, bringing a dynamic angle to things and more intensity to the close shot. -While the character is more upright in this shot compared to Drawing B, in Drawing C the chest still slightly overlaps the neck, preserving the feeling of being slightly below the character (putting them in a position of power relative to the viewer), which helps maintain confidence and power in the character. -the chest is exaggerated to carry the majority of the body’s line of action so even though you cannot see the legs, our brains are able to fill in the gap and envision that line of action. -The cropping/framing of the character allows for a more interesting composition/negative shapes created by the positive (character) on the negative (background), creating more visual interest as well as a circular motion to the composition through the arms, across the face to the negative space for the eyes to rest in before dropping to the hand in the background and back through the composition again.
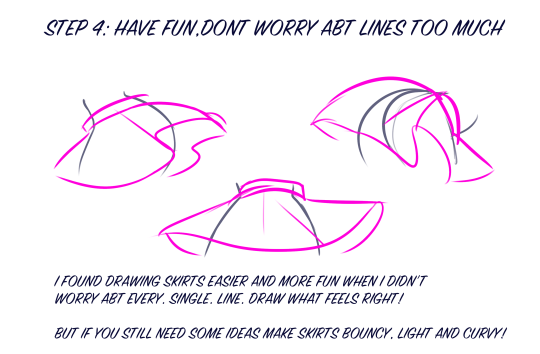
Pretty sure I’ve posted this before. But worth a repost
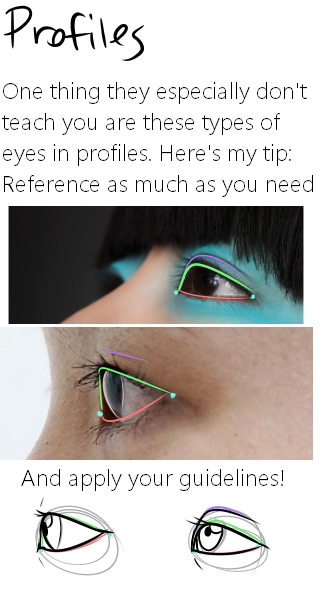
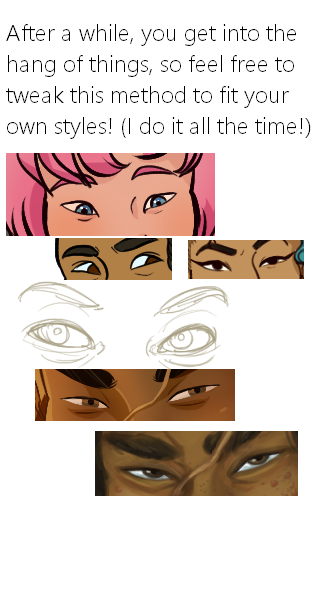
Here it is, my long winded tutorial, complete with some step by step action. I see a lot of people talk about wanting to diversify their artwork but not knowing how. This is my help to you. You really should take the time to invest in learning diverse eye shapes as diverse artwork always makes you a better artist. And frankly I’m really tired of drawing tutorials that talk up character diversity but only have the stereotypical “one Asian eye”.
I did some step by steps for those three diagrams, but I actually got them from this blog which has 14 of those examples! (Bonus: it’s a makeup blog so if you need help with that or want some idea of how to shade these eyes, there ya go)
I’m not sure how to answer this concisely because it depends on so many things… the style im using for the drawing, how realistic im trying to be, the hair itself (texture, colour, style, length, etc) environmental factors (is it wet, blowing, tangled, clean/dirty etc) but uh, heres a quick little doodle pointing out some stuff? Basically when I draw anything its sort of a “how many things affect this thing” so all those things above tend to be questioned?
If you’re drawing a character with short curly hair with lots of texture and volume who just ran through the woods away from a monster and is dirty and sweaty vs drawing a character with long smooth hair half submerged in a lake (aka part of it is going to be slicked down and part floating and buoyant)- those are two VERY different approaches to hair. Or like, if its super stylized, it might just be big chunky shapes. Or think like, alphonse mucha, that hair is very stylized.
idk if this helps at all lmfao. Feel free to ask more questions if theres smthn else u were tryna get at that went over my head. (also sorry i merged my sketch and line layer so its a little messy)
a thing i only recently realized i knew abt character design that isnt just common sense apparently:
do not start ur character design by doing a full, refined turnaround/model sheet.
like. everyone in my childrens book il class is fuckin doing this even though most of them are illustration majors and its a huge mistake (our prof literally warned them against this, and YET)
any time you design a character, start by not caring. by just doing what feels right. dont settle on the first thing; play around. and then draw your character a shitload of times before u start a ref sheet
dont finish anything, just. do super fast sketches of them over and over and over. fill up a page or two. as you draw them theyll evolve. that will happen whether your sketch it out at the beginning or jump right into a final draft, and lemme tell u, u do NOT want ur character evolving and changing AFTER ur final draft. u want to get that out of the way early so u can get a decently consistent finished product
then when you go to do your model sheet you will already be able to keep your character on model without it bc youve drawn them a shitload of times. then it wont be “struggling to draw the character the same every time” itll just be “this is what the character looks like and i could draw them with my eyes closed bc of muscle memory”
dont just jump in and be like “shit i gotta have this full complex polished thing right out of the gate!” like. in the beginning, Do Not Work Hard. play. play a lot. and THEN do a refined drawing. your refined drawing will look way better, too, bc by then youll be completely comfortable with your design
its just a super bad idea to present a character as “heres a ref sheet” as soon as you have a concept. your concept will evolve and u have to let it, or else ur designs will look rushed/bad and your drawing will looks stiff and uncomfortable bc u can only draw ur character at a ¾ths view in a particular pose bc youve drawn them twice in ur entire life
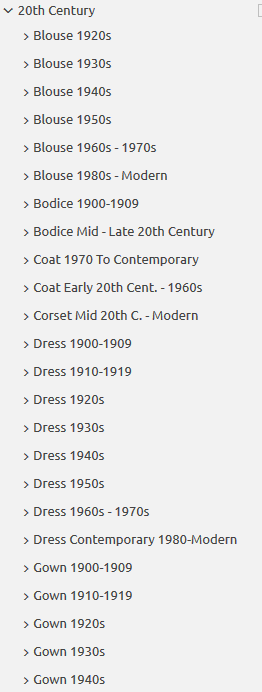
Do you design a lot of characters living in not-modern eras and you’re tired of combing through google for the perfect outfit references? Well I got good news for you kiddo, this website has you covered! Originally @modmad made a post about it, but her link stopped working and I managed to fix it, so here’s a new post. Basically, this is a costume rental website for plays and stage shows and what not, they have outfits for several different decades from medieval to the 1980s. LOOK AT THIS SELECTION:
OPEN ANY CATEGORY AND OH LORDY–
There’s a lot of really specific stuff in here, I design a lot of 1930s characters for my ask blog and with more chapters on the way for the game it belongs to I’m gonna be designing more, and this website is going to be an invaluable reference. I hope this can be useful to my other fellow artists as well! 🙂
i usually have two approaches: ‘outlining’ and ‘simple ‘construction’
most of the time i won’t even draw all individual fingers but just merge them together or try simplifying by breaking the hand/foot down into shapes, that will make it easier to ‘construct’ and pose.
unless you want to draw stuff for feet/hand fetishists or have a very ‘realistic’ style you don’t need to over do it with the detail.
of course the easiest way is to use reference, just look at your own hand and feet…unless you don’t have any, but there’s google. I don’t know any ‘specific’ books on that but there is ‘’Drawing Dynamic Hands by Burne Hogarth‘’ you could check out.
well that is simple, the head ideally sits in the middle of the spine…
positioning the head is not the difficult part, in most cases ‘artists’ don’t need to make things ‘look’ right
but make it ‘feel’ right. specially when drawing idealized and/or from imagination altering proportions and poses is rather common ⁽ˢᵘᵖᵉʳʰᵉʳᵒ ᶜᵒᵐᶦᶜ ᵃʳᵗᶦˢᵗˢ ᶠᵒʳ ᵉˣᵃᵐᵖᶫᵉ⁾
the easiest way⁽ᶦᶰ ᵐʸ ᵒᵖᶦᶰᶦᵒᶰ⁾ is to use the shoulders. Most of the time when drawing poses i will actually place the shoulders first and then draw the head. Maybe try ‘gesture drawing’ as exercise.